Donnerstag, 30. Mai 2013

Flowers on Kiko 339 (Cornflower)

Hi everyone,

I don't have a lot to show today, as I'm still working on my pictures. I got a couple of packages in the mail over the past 10 days... So I spent the two sunny days this week swatching and playing with colors instead of looking through my pictures and writing posts. But since it's probably raining again starting tomorrow, I'll have lots of time ;)

One of the polishes I ordered is Kiko 339 also known as Cornflower. It's a nice light blue with a slight purple tinge making it look very soft. Definitely not cornflower blue though. Or at least not the color of my local cornflowers. (I love cornflowers. In a week or so, the cornflowers will probably start blooming here - I'm so looking forward to that!) Just like most of my Kiko polishes, this one was easy to work with, leveled enough for my taste and is quite glossy on its own. This is three thin coats without topcoat.

So, heute habe ich einen bemalten Swatch von Kiko 339, Cornflower, für euch. Ein hübsches Hellblau mit Stich ins Violette. Für mich zwar kein Kornblumenblau, aber trotzdem eine Farbe, die in mein Beuteschema passt. (In einer Woche werden vermutlich hier die Kornblumen anfangen zu blühen - ich freu mich schon tierisch drauf~) Wie die meisten meiner Kiko-Lacke war auch dieser recht unkompliziert. I trage hier drei dünne Schichten ohne Topcoat.


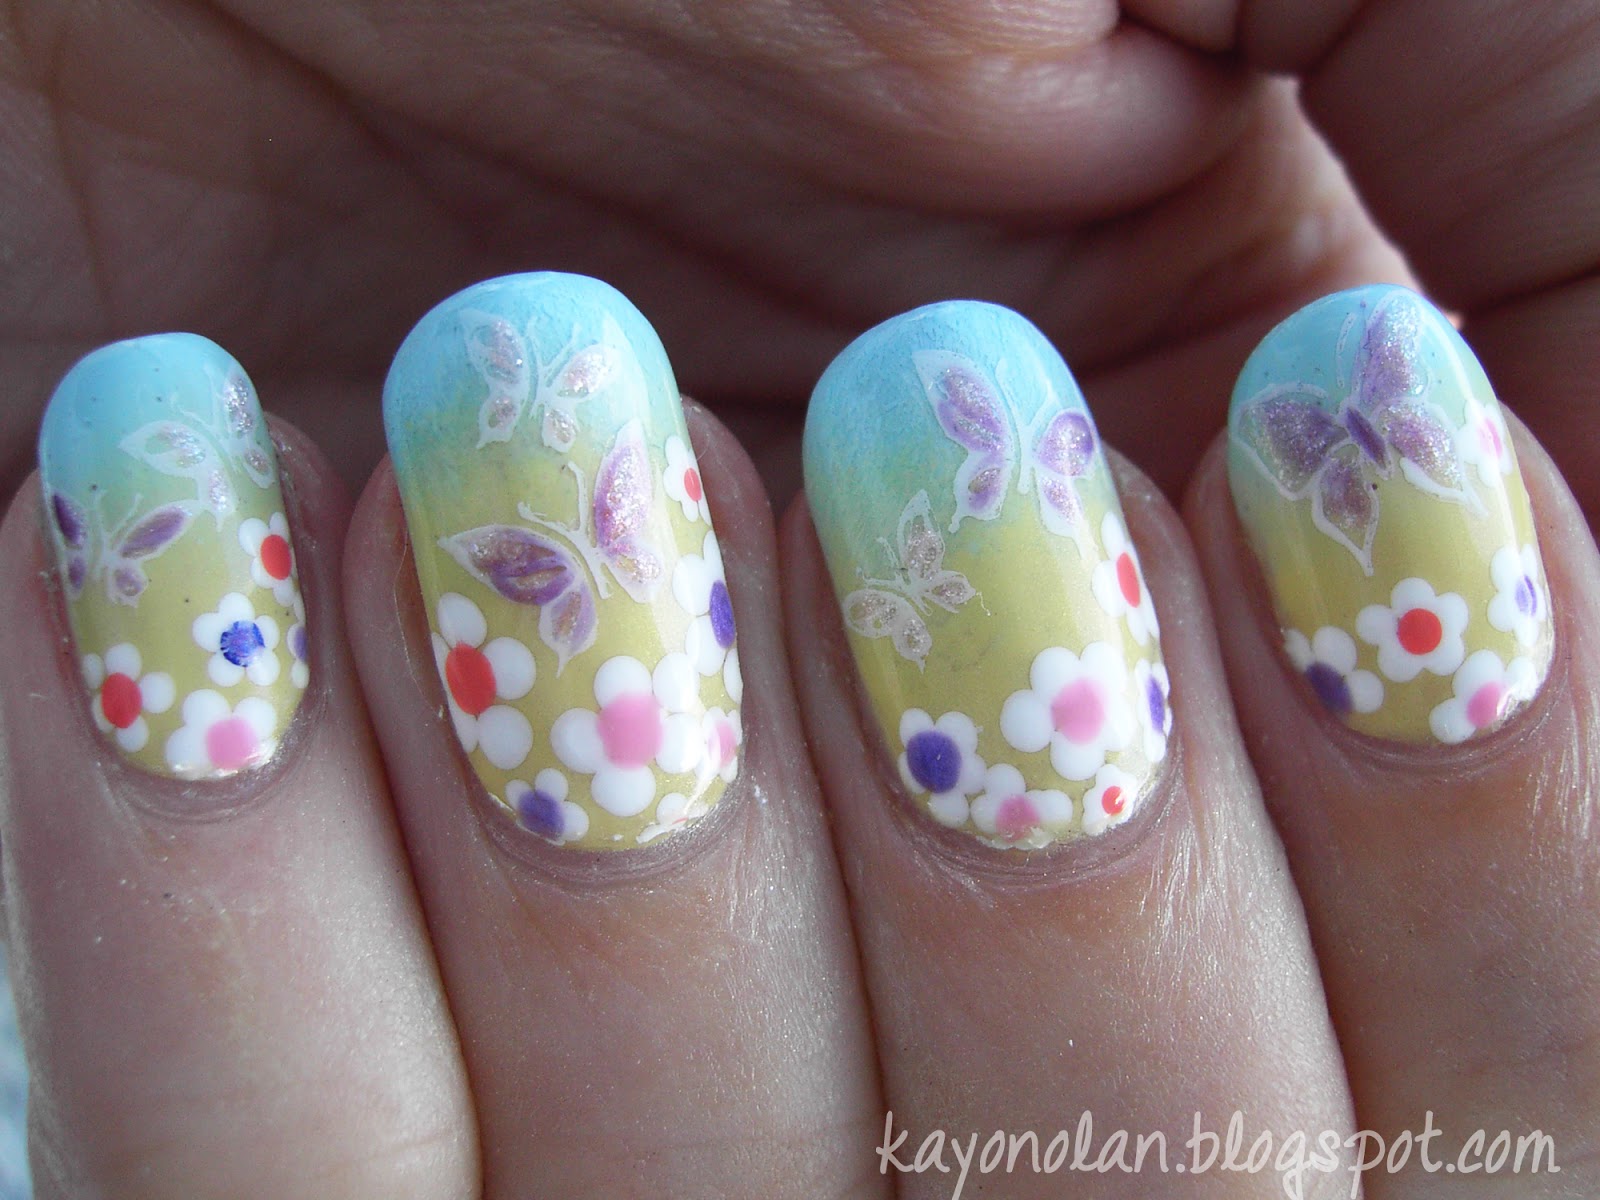
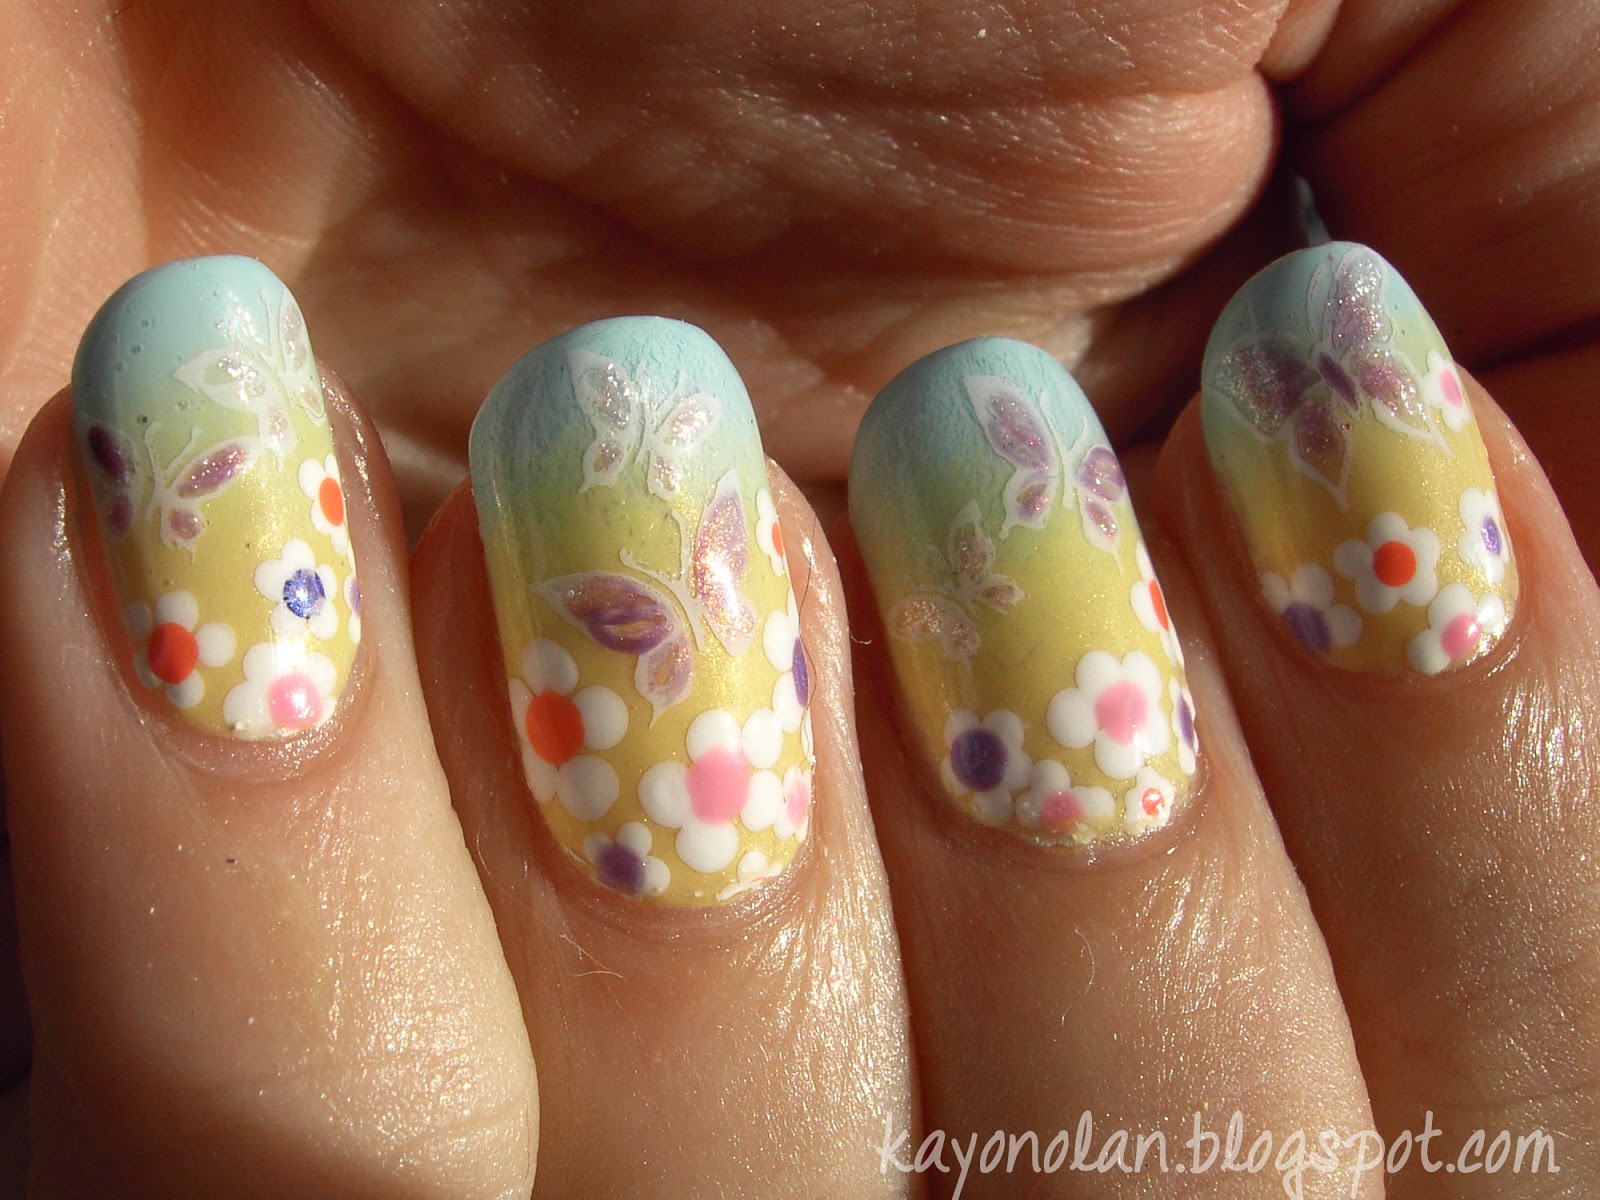
Originally, I wanted to simply swatch this and then move on to some other polish from my order, but just when I finished painting my nails, the sun hid behind clouds for quite sometime and "forced" me to paint flowers on it while waiting for her to show herself. So the pictures above are in cloudy daylight, the ones below in sunlight. I just practised some brushstrokes here. Nothing special. But I like white on blue, so I decided to share it despite it being so simple.

Eigentlich wollte ich Kiko 339 nur swatchen und mir dann den nächsten Lack vornehmen. Leider hat sich die Sonne aber just in dem Moment versteckt, als ich mit Lackieren fertig war. Daher war ich dann leider gezwungen die Mani als Hintergrund für ein paar Pinselübungen zu verwenden, während ich auf die liebe Sonne gewartet habe. Ich mag Weiß auf Blau, daher poste ich es trotz der Einfachheit des Ganzen.


This is white acrylic paint, as usual. Instead of BTGN Top Sealer, I used my selfmade Fairy Dust to seal it and add some sparkles at the same time. It doesn't show up a lot though.

Die Blümchen habe ich, wie immer, mit weißer Acrylfarbe gepinselt. Statt BTGN Top Sealer habe ich aber meinen selbstgemachten Fairy Dust verwendet, um das Ganze auf Glanz zu bringen und dabei noch ein bisschen Glitzer ins Spiel zu bringen. Leider braucht man etwas Fantasie, um es zu erkennen.

What do you think of Kiko 339 - and the result of my tiny training session?
Was haltet ihr von Kiko 339 - und dem Ergebnis meiner kleinen Trainingseinheit?

Donnerstag, 23. Mai 2013

The Nail Challenge Collaborative - Stamping - Week 3

Another four days without any posts. I can't handle my early shifts well lately. I'm just so tired afterwards that I can't muster the strength to do anything after work. Not even writing a blog post... haha. Maybe I should get my blood tested again... But! Since today was a day off, I'm here to show you another manicure for the Nail Challenge Collaborative.

In letzter Zeit bekommen mir meine Frühschichten irgendwie so gar nicht. Ich bin den ganzen Tag so müde, dass ich mich nach Feierabend zu rein gar nichts mehr aufraffen kann. Nicht mal einen kurz Blogpost zu schreiben. Vielleicht sollte ich meine Blutwerte mal wieder überprüfen lassen... Naja, egal. Heute habe ich frei und darum geht es heute weiter mit einer Maniküre für die Nail Challenge Collaborative! (Wer mitmachen möchte, wir freuen uns immer! Zur Gruppe geht's via Klick auf den Button oben rechts.)


I started with two coats of essie maximillian strasse her, a beautiful mint-ish grey, that just doesn't really seem to belong to a spring collection, but fits so well this year... the year of no spring (apparently). Afterwards, I started deciding what to do with each finger, as I planned to do different stuff to each nail.

Angefangen habe ich mit zwei Schichten essie maximillian strasse her, einem wunderschönen mintigen Grauton. Oder grauem Minzton. Whatever. Ich finde diesen Farbton sehr ungewöhnlich in einer Frühjahrskollektion, aber dieses Jahr passt es ja wie die Faust auf's Auge... Der Frühling lässt ja immer noch sehr bitten. Während ich wartete, dass der Lack trocknet, habe ich mir überlegt, was ich mit den einzelnen Nägeln anstellen wollte.


On my index and pinky, I stamped using white and fauxnad plate m60. I went in with a striper brush and some Flormar 392, a holographic glitter, to make it a little more interesting.

Auf Zeige- und kleinem Finger habe ich mit Weiß und Schablone m60 gestamped und dann einige Linien mit ein wenig Flormar 392 nachgezogen, um das Ganze etwas interessanter zu machen.

For the middle, I taped half of the nail and then stamped using China Glaze Adore and fauxnad plate m65. I originally chose another one, but the image wouldn't transfer properly. After taking of the tape, I applied some silver striping tape instead.

Meinen Mittelfinger habe ich zunächst halb abgeklebt und dann mit China Glaze Adore und Schablone m65 gestamped. Den Übergang habe ich dann mit silbernem Striping Tape überklebt.


On my ringfinger, I did some embellishing using rhinestones and micro beads. I haven't done something like this in ages. It was a lot of fun to do! I took most pictures before topcoating this nail, because I experienced those micro beads melting on me a lot once I applied topcoat. Also, new rhinestones... didn't know if they would turn cloudy.

Meinen Ringfinger habe ich mit Strasssteinchen und Mikroperlen verziert. Da ich so etwas schon lange nicht mehr gemacht habe, war das mal wieder ein netter Zeitvertreib. Die Fotos oben habe ich alle ohne Topcoat auf diesem Nagel gemacht, da es mir zu oft passiert ist, dass diese Mikroperlen sich durch den Topcoat in Wohlgefallen aufgelöst und mir alles versaut haben.

The next morning, sunday, there were a couple of hours of sun before breakfast, so I quickly snapped some more pictures. This time, with topcoat. Man, BTGN Top Sealer bubbled on me like crazy. It's like this often when there's some decoration to cover. No idea why.

Am nächsten Morgen, Sonntag, gab es ein paar Stunden Sonnenlicht, die ich schnell ausgenutzt habe, um noch ein paar Fotos zu machen. Hier jetzt komplett mit Topcoat. Der BTGN Top Sealer hat wieder geblubbert, es war kaum zum Aushalten. Ich habe das in letzter Zeit öfter. Irgendwie mag der Topcoat Unebenheiten (Verzierungen) nicht, glaube ich.


I almost regret that I didn't try it with matte topcoat before taking it off. Might have been interesting! I really like the base though. It's kind of unusual.

What do you think of this?

Here's a lot of other beautiful stamping to see:

Sonntag, 19. Mai 2013

p2 - Hot Berry (Swatch & Comparison)

Hello,

The p2 Summer Attack collection has been on the shelves for a while now, but I have yet to show swatches for the other two polishes I got, aside from the green one, I posted already. I decided to continue with the red polish called Hot Berry. I wasn't sure at first, if I really wanted that because there has been talk about it being similar to Zoya Rica, which I also own. In the end, I decided to get it nevertheless. Obviously, I did a comparison which you can find at the end of this post.

In diesem Post möchte ich p2 Hot Berry vorstellen, einen Lack aus der Summer Attack-Kollektion, die ja schon ein Weilchen bei dm im Regal steht. Ich habe mich letztlich doch entschlossen den Lack zu kaufen, weil ich neugierig war, ob er Zoya Rica wirklich so ähnlich sieht.


I found myself liking this polish quite a bit and I rarely wear red polish. It's a bit difficult to describe. In store, it looked like a dark red leaning orange to me, which I found appealing from the very start. At home, it was more of an orange leaning red, but still nice. When painting it on my nails, the first layer turned out to be quite pink, so I guess the base is neither of the above.

Ich mag den Lack überraschend gern, dabei trage ich Rot mit am Seltensten. Im Laden erschien er mir immer wie ein dunkles Orange, zuhause dann eher wie ein orangestichiges Rot. Die erste Schicht war aber eher Pink.
indoors
It turnes orange-y, because of the massive amount of gold particles in Hot Berry. It has the same kind of finish as the glittery/shimmery polishes by Zoya, which I love so much. But Hot Berry is a lot more dense than the Zoya polishes I can compare it to. Since Hot Berry consists of tiny particles, it's a bit messy to remove. You'll end up with glittery fingers, if you're not careful. The foil method worked great to avoid this problem though.

Der Eindruck, dass der Lack so orange ist, stammt von den goldenen Glitzerpartikeln, die zuhauf in dem Lack herumschwimmen. Die ganze Kollektion hat ja dieses Glitzerfinish, das ich an so vielen Zoya-Lacken liebe. Diese Partikel sind leider nicht ganz einfach zu entfernen. Man hat schnell glitzernde Finger, wenn man nicht aufpasst. Um dieses Problem zu umschiffen, kann ich die Folienmethode zum Ablackieren dieser Art Lack aber sehr empfehlen,


Drying time on these was so-so. I didn't want to apply a fast-drying topcoat for a swatch, so I ended up denting my pinky a bit. On my pictures, I'm wearing two medium coats, except for my pinky which got a third due to the dent. Depending on the light, you can still tell where the nail line is, but I'd say you only need three if you have rather long nails.

Die Trockenzeit war so lala. Ich habe nicht so super aufgepasst und mir eine Macke in den Nagel meines kleinen Fingers gehauen. Darum hat dieser Nagel im Gegensatz zu den anderen drei Schichten Lack abbekommen. Ich denke, zwei Schichten reichen, es sei denn man hat längere Nägel - dann sieht man in bestimmten Winkeln den Nagelrand doch ziemlich durch.

Next, my comparison with Zoya Rica, which some others found similar.

Und dann noch mein Vergleich mit Zoya Rica.


I don't really find them close. As mentioned above, they're the same kind of polish, but the colors are quite different. Rica is more of a pink leaning coral with loads of gold particles, while Hot Berry is a dark vivid orange with the same kind of gold particles thrown in. Rica looks a lot softer than Hot Berry. Definitely no dupe here.

Also ich finde nicht, dass sich die Lacke so besonders ähnlich sind. Das Finish ist das Gleiche, aber die Farben nicht. Rica ist mehr ein pinkstichtiges Koralle, während Hot Berry doch richtig Orangerot ist. Rica ist insgesamt weniger intensiv. Also meiner Ansicht nach kein Dupe.

Also, these are four coats of Rica next to two coats of Hot Berry. That's what I meant with the Zoyas being rather sheer... I wouldn't want to miss Rica. It has been on my wish list for so long and I think it goes so nicely with my skintone. I still love it a lot. (Once again, thanks to Chester!)

Auf den Bildern trage im Übrigen vier Schichten Rica. Die Zoyas, die ich mit diesem Finish habe, sind alle recht sheer, daher hat mich das nicht gewundert. Ich würde Rica trotzdem nicht missen wollen. Er stand ja lang auf meiner Wunschliste und ich mag ihn sehr. Danke noch mal an Chester!

By the way, it's really no fun writing blog posts about summery polishes while it's raining hard outside...

Thanks for reading!

Freitag, 17. Mai 2013

The Nail Challenge Collaborative - Stamping - Week 2

Hallihallo~

Today, I'd like to continue showing you the results of my stamping practice. I admit that I didn't really do any nail art this past week. I was just wearing plain polish... at least only stuff from my stash of untrieds. So my second manicure for this month of stamping is about a week old.

Obviously, this one is not entirely stamped. I didn't fancy any of the big designs I have that day, but the stars and butterfly images on my plates gave me a couple of ideas. I ended up with the butterflies and yet another pastel manicure.


For this mani, I started with sponging my background using essence my yellow fellow and an unnamed Color Club blue. This required a couple of coats, but sponging is kind of fun... I just hate it when I mess up on the third layer.

Für dieses Design habe ich mir zunächst einmal den Hintergrund gesponged. Verwendet habe ich dafür essence my yellow fellow und einen blauen Color Club-Lack, dessen Name mir nicht bekannt ist. Da insbesondere das Gelb nicht so super deckt, brauchte das ganze ein paar Schichten.


Next, I grabbed my dotting tool and created the little flowers near my cuticle area. I actually had to stop myself adding more and more. But I still needed some space for my butterflies. The white is acrylic paint, the colorful dots some random polishes from my untrieds.

Als nächstes habe ich mit Dotting Tool und weißer Acrylfarbe die Blümchen hinzugefügt. Hier musste ich ein bisschen aufpassen, dass ich mir nicht zu viel Fläche mit Blümchen bedeckte. Die bunten Punkte sind Lacke aus meinem nicht kleiner werdenen Haufen unbenutzer Lacke.


Lastly, I stamped the butterflies using plates H19 and fauxnad m78. I used the white stamping polish that came with my original Konad stamping set, but it turned out surprisingly sheer. That gave me the idea to go in with some other sheer colors to make the butterflies stand out a little bit. I used Milani She's so glitzy and H&M Urban Spirit. (It's a coincidence that I just posted a manicure yesterday that used Urban Spirit... I hadn't used it since...)

Zu guter letzt habe ich dann die Schmetterlingsmotive der Schablonen H19 und M78 verwendet und auf den freien Teil gestamped. Trotz Konad Stampinglack waren sie aber irgendwie nicht so intensiv, wie ich mir das vorstellte. Damit sie nicht untergehen, habe ich die Flügel noch ein wenig koloriert.


There's not much else to say about this manicure. It was kind of cute, but I wish I had used white polish for the flowers instead of acrylic paint. The flowers are a little intense... or the butterflies not intense enough. This is also the last manicure on "long" nails. I go impatient again...

What do you think?

Have a great weekend and thanks for reading! :)


Donnerstag, 16. Mai 2013

Fairy Tail inspired...

Hi everyone!

Some of you might know that instead of living in Germany, I would rather live in Japan. I have lived there before and I like it so much better than Germany (though I like Germany too). My love for Japan sprung from my love for anime back when I was a kid/teenager. I used to be a crazy Sailor Moon fangirl, when I was like 12 years old. Haha. I even studied a Japan related major and thus spent some time living overseas.
That's when I got over anime mostly. There's just too much animated stuff going on there, it killed it for me. But once in a while, I get in the mood to watch some anime.

Last fall, I did a crazy marathon watching an anime called Fairy Tail. In one of the boss fights, there were these weird foggy/jelly monsters that had this see-through thing going on that reminded me of jelly polishes. While watching this episode, I kept thinking how I could do this on my nails... and being a polish addict, I started working on it as soon as I finished watching.

So here are some Fairy Tail inspired nails. Weird monster inspired nails. :D


Since I did these more than half a year ago, I don't remember all the polishes I used for this one. I used the acid wash technique to create this look, so it involved a lot of layering. I remember two pinks and at least two purples. One of them Barry M Indigo, the other one was an essence polish. On top I sponged on one thin coat of H&M Urban Spirit to add some sparkles. Around the edges I added a thin stripe of black using a striper and on top of that one coat of the essence Smoky Topcoat, a sheer black jelly, to soften the black.

Instead of a Q-Tip, I used my clean-up brush and some acetone to dig trough all the polish layers. I'm not sure if all those coats of polish were necessary to create this. If you look very closely, you can tell that there's a "gradient" in those pink bolts. But honestly... if it's barely visible on zoomed pictures..?


I liked the look on my pictures, even though they didn't turn out all that great. The black around the edges and the vibrant Indigo... love! But in reality, I couldn't even stand the design on my nails for an entire day. It might have been different if I had purple jelly polishes at hand, but since I don't own any, I had to use cremes. That's what you get for trying to replicate some anime monster. Haha.

What do you think? Have you tried the acid wash technique at some point? Up to this point my initial acid wash manicure is still by far the most watched post of my blog.

****************
Zum Schluss eine Frage an die deutschen Leser. Anhand meiner Statistiken fällt mir auf, dass ich in letzter Zeit wieder mehr deutsche Klicks habe als amerikanische. Wie ist das mit dem Englisch? Passt das oder wäre es euch lieber, wennn zumindest eine deutsche Zusammenfassung im Post beinhaltet wäre?
****************

That's it for today. Time to get ready for work...

Dienstag, 14. Mai 2013

Kiko 400 - Steel Grey (Swatch)

Good morning!

While scrolling through my blog pictures folder, I noticed that I never posted my swatches of the fourth polish from the Kiko Lavish Oriental collection. I bought this one a couple of weeks later than the rest, which is probably the reason. But for consistency, here are the swatches of Kiko 400 aka Steel Grey.


I'm glad that I bought it. I wasn't so interested in this grey at first, but after seeing swatches I felt the need to buy it. Together with the beige holo, Steel Grey got the strongest holo effect out of the four. But it's not an in your face holo. I'm still waiting for my China Glaze holos... I can't wait to compare their holoness. Though, I already know that the particle size is different.


Since I tried to capture the holo effect on all the other pictures, here's one in lamp light. The holo is still there, but it's faint. I find it pretty in this 'state' too. It's a sparkly grey, quite opaque (2 coats) and its drying time is quite good. Also, topcoat doesn't dull the holo effect. I have yet to try them Lavish Oriental polishes for stamping, but I think there are better ones.

Have you got any of the Lavish Oriental Holos? What do you think of them?
Have a nice day~

Montag, 13. Mai 2013

The Nail Challenge Collaborative - Stamping - Week 1

Hi everyone!

Here's another post for the Nail Challenge Collaborative. I'm starting the posts for the new theme for May: stamping. This month definitely is a challenge for me. I still didn't really get the hang of stamping, but I'll practice my stamping skills this month. So far, 90% of the manicures I wore this month involved some kind of stamping. I decided to try a couple of things and post when I'm fine with the outcome. I got two manicures so far. Today, I'll show you the first.

For this manicure, I used essence Skyscraper as my base. This polish is from my growing stash of untrieds and belongs to the Urban Messages edition from 2011, I think. It's a weird polish, but I like it. I was inspired by the blouse I was wearing that day. At least colorwise.


I used fauxnad plate m64 for this mani. It's a full nail design and honestly, I didn't expect it to stamp so well. I'm still not sure if I just have crappy plates, or if I just managed to transfer it properly for once... To find out, I might buy another set sometime soon.

For the stamp, I used three stamping polishes: green, blue and pink. I applied a couple of drops and mixed them on the plate while scraping off the colors. It worked nicely.


And here are two picture of the base by itself. essence Skyscaper is grey polish with a hint of beige, brown micro particles and a faint blue shimmer. It really does remind me of concrete. Sadly, my camera isn't able to photograph well enough to show the micro particles.


That's it for today! Thanks for reading! :)


Dienstag, 7. Mai 2013

KB Shimmer - Let's get star-ted

Last week, my very first indie polish arrived! I found it second hand by chance and couldn't resist to get it. And I'm absolutely not regretting it! It's no polish I really had my eyes on, but it perfectly fits "my kind" of polish.

The polish I got is KB Shimmer Let's get star-ted. It's a sheer milky white polish with black hex-glitter in two sizes, aqua hex-glitter in two sizes, large purple hex-glitter, fine purple glitter and black stars. Stars!  I love star shapes, so this is a winner just because there's stars in it.

I noticed how sheer it is by just opening the bottle and decided to layer it over white. I used a single coat of white underwear, but it would have been better to use two. On top are two coats of Let's get star-ted.


Fishing for glitters isn't necessary, but arrangement is. On my pinky for example I didn't get any aqua glitters, but since it's tiny and got a star, it was fine with me. On the other nails I added glitter here and there, when I wasn't satisfied with the paint on distribution. I'm really pleased that there are enough stars in there to have at least one on each nail without having to look for them on the brush.


The first coat obviously turned into a glitter sandwich after I applied the second coat, but that just makes it look kind of dreamy. It looked so soft! I'm really in love with this polish right now. Also, I'm quite pleased with the formula and drying time. Nothing less than what I expect from mass produced polishes too.

I wish KB Shimmer (and other indies) weren't so hard to get here in Germany. Shipping cost is a huge turn-off to me, so I have yet to place an order for indie polishes overseas. But having this one here let's me consider getting some more a least. Maybe I can convince my sister to get me some while she's in the States this summer...

What do you think about indies? And about this one?

Freitag, 3. Mai 2013

W7 - Metallic Neptune (Swatch + Comparison)

Since I'm really tired today, I'm just going to continue with some long overdue swatches. I don't remember when I started swatching the Metallic Planetes collection by W7... but it was quite a while ago... just looking at how long my nails were back then.

So here's W7 Metallic Neptune. In my swatches you see Neptune on all but my ringfinger nail. That one has Model's Own Emerald Black. I don't remember how many coats I did. At least two, at most three plus topcoat.


At first glance, there's barely any difference between these two polishes. But for polish enthusiasts there's a huge difference ;) Neptune is a really blackened teal, while Black Emerald is a blackened green, just as the name suggests. I prefer the Model's Own out of these two. The green looks more interesting than the teal and seems to glow from within, while Neptune is pretty, but it's lacking that special something. Both are supposed to be duochromes, but I don't see it in either. Maybe it's just too subtle for my understanding of duochrome.


Even though I prefer Emerald Black colorwise, I prefer the W7 formula. I just can't stand the smell of Model's Own polishes. The only brand that stinks even worse is Kleancolor... So in the end, for me, I'd give them the same rating. I'll keep both. :)

Thanks for reading!
Related Posts Plugin for WordPress, Blogger...