Montag, 26. Dezember 2011

Auslosung Adventskalender Türchen #7

Sooo, leider bin ich am 22. nicht dazu gekommen mein Adventskalendertürchen auszulosen. Gerade habe ich mich aber hingesetzt und es endlich mal gemacht. ^^;

Also insgesamt gab es 17 gültige Teilnahmen. Ein paar wenige musste ich ausschließen, weil sie entweder die Frage nicht beantwortet hatten oder keine Leser meines Blogs (geworden) sind. Gut für die anderen! Ich habe es mir jetzt kurzerhand einfach gemacht und das Auslosen random.org überlassen. Herausgekommen ist folgendes Ergebnis:

Mein Türchen geht damit an Caro Lolcat! Glückwunsch!
Die Email an dich ist bereits rausgegangen. Bitte antworte mir in den nächsten 48 Stunden, sonst lose ich neu aus!

Danke auch an alle anderen, die teilgenommen haben und hoffentlich Leser bleiben werden ;) Ich würde mich sehr darüber freuen!

My Christmas mani

On the last day of the Christmas holidays here in Germany, I want to show my Christmas manicure that I have been wearing on the 24th and the 25th. Yep, I already changed it. (Too much inspiration these days)

I bought myself a new dress on the 23rd and decided that I would wear it on Christmas Eve, the big holiday here in Germany. I only celebrated with my parents, sisters and grandparents, but I still felt like dressing up a little. The dress is white and taupish satin, so I had to think of a new design. But since I was running out of time, it's just a layering of some glitter polishes. I still liked the outcome a lot though. It really matched the dress.

Here's what I used:

* Microcell 2000 Nail Repair (base)
* Catrice Be my Millionaire
* Canmake 05
* Canmake 70
* essence BTGN Top Sealer

All polishes I haven't used in ages! Be my Millionaire is among my first Catrice polishes, but well, my collection started growing exponentially and I never got around to wear it again. Same goes for the glitters. Canmake is a Japanese brand, by the way.


Be my Millionaire on its own. To sum it up: beautiful color, but streaky as hell! I doubt I will ever wear this one solo! This is two coats which applied effortlessly and dried quite quickly, too.


Doesn't this one look like I mattified it?

One coat of each of the glitters on top and then finished with one coat of BTGN Top Sealer. It looked really pretty and sparkly. Canmake and the Top Sealer don't like each other apparently. Even though it dried for several hours, I still got sheet marks on my tips where I applied the glitters. Meh.

Freitag, 23. Dezember 2011

Candy Cane

Sometime last weekend I realised that I hadn't done a Christmas design so far. I don't count snowflakes... those are winter designs for me. So I thought what I could paint my nails like. I needed a design that wasn't too time consuming and that I wouldn't bemoan if it got destroyed. Why? Well, my parents forced me to go through all of my moving boxes to decide what I still need. I'm blocking almost a whole room in the house with my stuff, so it's understandable. I still have a lot to go through and I bet that even though it's Christmas Eve, I'll be sitting in that room at some point tomorrow...

Anyway, I decided on a Candy Cane design. It's rather quickly done and also an opportunity to practice working with my striper brushes. Btw, while going through my boxes, I found my nail art brushes. So that's definitely a good thing :D

First, I painted my nails with two coats of essence perfectly true and then added the stripes using p2 cheerful red. perfectly true is a discontinued polish that I recently found on sale. Sadness! Why is this one discontinued!? It applied really well for a white! cheerful red also applied well. I like that color. It's from the current p2 LE "Happy New Nails". I'm going to wear this solo soon enough... such a nice bright color! Topped the whole thing with one coat of essence BTGN Top Sealer. I just love this top coat <3


Oh well. I really need a lot of practice with those striping brushes! My right hand turned out better, because I started to get a hang of it, but the tip wear is so bad... erm, yes. This is after one day of looking through boxes. No daylight pictures as it is raining since Wednesday. I wish it was snow...

Donnerstag, 22. Dezember 2011

Mattified blue and some glitter from the sea

Today another rather quick manicure. I had the late shift for about 3 weeks and was thus lacking the time to do proper designs. I just can't find the time in the morning... Also, I always end up bumping into something ruining all my work, so I prefer to do my nails in the evening.

Anyway, this is what I painted my nails like after I finished taking pictures for my Advent calendar tutorial. It's the same blue polish, but I just didn't feel like snowflakes yet. ^^


So this is p2 fancy, mattified using essie matte about you. Instead of matte about you, I used essence Mystic Mermaid on my accent nail. It's one of the Special Effect Toppers released sometime this year.
All my close up pictures of Mystic Mermaid ended up blurred, so sorry.


Since I didn't have much time to redo my manicure after 2 days of tipwear, I decided to use another of my untrieds: China Glaze Atlantis. It changed the color from blue to a dark blueish green which I found very beautiful. I loved it the most over Mystic Mermaid. All the pictures don't really do it justice though. The sparcle was soooo great!

I'm still not a 100% convinced though, that my bottle of Atlantis is genuine... :(

Montag, 19. Dezember 2011

p2 - jolly silver (Happy New Nails)

Last week, I went to the city to do some Christmas shopping in my lunch break and even though I put myself on a no-buy-week (except for Christmas), I ended up buying 2 polishes....

One of them, I want to show today. p2, dm store's in-house cosmetics brand, recently released a new limited edition called "Happy New Nails" that's consisting of three polishes and some other stuff like hand cream. I bought two of those polishes, the silver and the red one. The third is a gold colored polish, but the color gave me the impression of not going too well with my skintone, like most golds. I was originally drawn to the small display, because of the silver polish. I was actually wearing silver nails that day but I was disappointed by the silver polish I'd used. It was sheer... and slow drying and showed very obvious brush strokes. Boo. So when I saw the new LE, I decided to get a new silver polish. And I'm glad I decided that way!


jolly silver is quite opaque with its first coat, but I used two anyway. It has tiny tiny silver glitter that make it really sparkly. Very pretty. It was a bit slow drying though and you have to be careful when applying the second coat. I experienced some cuticle drag, but managed to smooth is out. You can see some brush strokes here, but it is actually possible to apply it without any brush strokes. My right hand(!) was almost perfect.


I think I found my new go-to silver polish. I'll try how it works with stamping soon. It would be amazing if it was still as opaque when stamped! ♥


Last picture was taken in sunlight! You have to be really lucky in Germany these days to catch a ray of sunlight, but this morning I was lucky enough, haha. Well, it's the third day of wear, so please excuse the tip wear. I did a day of marathon cooking yesterday and I'm actually surprised how well they still look after all that work. The pink polish is the second from that LE I bought. It's called cheerful red, but is more of a pink. I fell in love with this one at first sight too. I'll post about it seperately.

All three polishes are available in dm stores right now, contain 8ml and cost 2,25€. More expensive than the standard line, but it's still okay.

What do you think? What's your favorite silver polish?

Samstag, 17. Dezember 2011

Gewinnspiel bei PicturedTinsel

PicturedTinsel ist ein Blog, auf den ich erst vor einigen Wochen aufmerksam geworden bin. Ich verstehe ehrlich gesagt nicht, wieso sie bislang so wenig Leser hat, denn ihre Naildesigns sind echt toll! Wer den Blog noch nicht kennt, der sollte unbedingt mal vorbeischauen!

Nun ja, Elena hat auf ihrem Blog jedenfalls kürzlich die 100 Leser-Marke geknackt und verlost zu diesem Anlass neben zwei wunderschönen China Glaze-Lacken ein Mini-Set der aktuellen OPI Muppets-Kollektion. Beinhaltet sind unter anderem Designer... de better! und Warm & Fozzie, zwei Lacke, mit denen ich bereits eine Weile liebäugle. ♥


Teilnahmeschluss bei diesem Gewinnspiel ist heute, Mitternacht - also in etwa 2,5 Stunden. ^^; Last Minute, wie immer. Wer noch mitmachen möchte, klickt -->hier<--

Freitag, 16. Dezember 2011

Catrice - Yes, You Tan!

Today, I want to show one of my newer Catrice polishes. Since about a month ago, there's finally a shop in my town that sells the whole Catrice cosmetics range. When I first went there, I got Catrice Yes, You Tan! from the Bohemian LE among others. I wasn't sure if this would go with my skintone, but I actually liked it!

Sadly, there was no sunlight that week, so my pictures are all shot indoors.


Daylight, but no sun

I stamped a flower pattern on my ring finger nail as an accent using Catrice Goldfinger. Since Yes, You Tan! has gold shimmer too, the stamped pattern turned out to be rather subtle.

I'm really looking forward to the day those stupid marks on my nails are finally gone. I still thank that one nice customer for them...

Dienstag, 13. Dezember 2011

French Manicure... somehow

Today, I want to show you a manicure I did a while back... that I'm still not sure is a fail or a non-fail. It didn't turn out the way I imagined, but it's not all bad...
I wanted to do something French manicure-like without the clean look of a classic French manicure. I imagined a sponged look with some silver. Since I used only polishes that I hadn't used before, it didn't exactly look the way I wanted it too.


But just take a look...


There's only one picture, because I was so unimpressed with the final result, that I only took a total of four pictures. ^^;

Anyway, I used Catrice Cotton Candy at Eiffel Tower as my French base color. I sponged some white using essence Perfectly True and then sponged some Catrice My Best Friend's Tiara on top. I imagined the latter to be much more silvery than in turned out to be. My swatches looked more promising. Cotton Candy  is a nice color, but it gets quite milky looking and I think due to that, there was not enough contrast to the sponged white. I added those star rhinestones to give it something extra since the silver didn't show the way I wanted it to.

I don't know if I like it or not. Looking at my other manis, it's kind of boring. It's not exactly "me". But I still can't seem to say that I *don't* like it, too.

Sonntag, 11. Dezember 2011

Ich versuch mal wieder mein Glück ^^

Und zwar möchte ich dann auch mal bei einem der vielen Adventskalender, die es derzeit online gibt, mein Glück versuchen.

Ausgesucht habe ich mir das Törchen 9 bei Alenija. Sie verlost noch bis heute abend folgendes:


Wer mal schauen möchte, klick aufs Bild! Mein eigenes Törchen ist im Übrigen auch noch offen und würde sich über weitere Teilnahmen freuen ;)

Freitag, 9. Dezember 2011

Some checkered nails

I recently got my new nail art brushes and one of them is a nice striping brush. To see if I can work with something like that, I did my first checkered nails. I admit that I never used a striping brush before. I also admit that I should have. It was so easy to do those nails with this new brush.

I got the idea from some japanese nail art magazine, but I don't recall which one and which issue.


I used Catrice Dirty Berry as the base color. I *love* this one. It was my very first Catrice polish and it was a great choice. If you have the chance, you should get it! I then painted a white halfmoon using white stamping polish and another one on top of the white using silver nail polish. Yes... I fail at painting halfmoons. I couldn't find my guides though. Lastly I used black and silver polish to do the stripes and added some silver glitter to the silver halfmoons. Topped with top coat and done. The next day, I also added some rhinestones.


I was actually quite proud when I was finally done. It took a while to do all these layers. Still, in the end, I think that the silver halfmoons turned out way too big. I should have made them smaller, so the white could show better. This way, I feel like there's too much silver.
What do you think?

Dienstag, 6. Dezember 2011

Tinks Blogger Adventskalender Türchen #7

Today, I'll post in German, because this post belongs to an Advent calendar done by a group of German speaking bloggers. But I think, it's not too hard to understand ;)

*******************************************************************************

Da wären wir heute also beim siebten Türchen angekommen und damit am Ende der ersten Woche unseres Blogger Adventskalenders!

Mein Blog dreht sich ja hauptsächlich um Nail Art und da dachte ich mir, ich zeige mal, dass das gar nicht so schwer ist, wie es manchmal ausschaut. Mein allerliebstes Weihnachts-/Wintermotiv sind Schneeflocken und daher habe ich ein kleines Tutorial erstellt, wie ihr euch mit wenig Aufwand und Mitteln ein paar Schneeflocken auf die Nägel pinseln könnt. :)

Ich wünschte ja, es würde endlich schneien!

Also, für das Ganze habe ich lediglich fünf verschiedene Dinge benutzt. Die drei wichtigsten habe ich mal fotografiert. Nummer 4 und 5 sind Top Coats.

Weiße Acrylfarbe - blauer Nagellack - ein Zahnstocher
Ich verwende meistens Acrylfarbe für Nailart, weil sie deutlich einfacher zu verarbeiten ist als Nagellack und den Vorteil hat, dass sie zunächst noch wasserlöslich ist und sich Patzer damit einfacher korrigieren lassen. Es funktioniert mit weißem Nagellack aber ganz genauso gut. Der blaue Nagellack, den ich hier verwendet habe stammt von p2 cosmetics, nennt sich fancy und ist schon Jahre alt... Zahnstocher sind auch nicht mein übliches Mittel der Wahl, aber ich will ja zeigen, dass man sich nicht unbedingt superfeine Pinsel anschaffen muss.

Dank Arbeitsunfall nun mit Macken im Nagel...

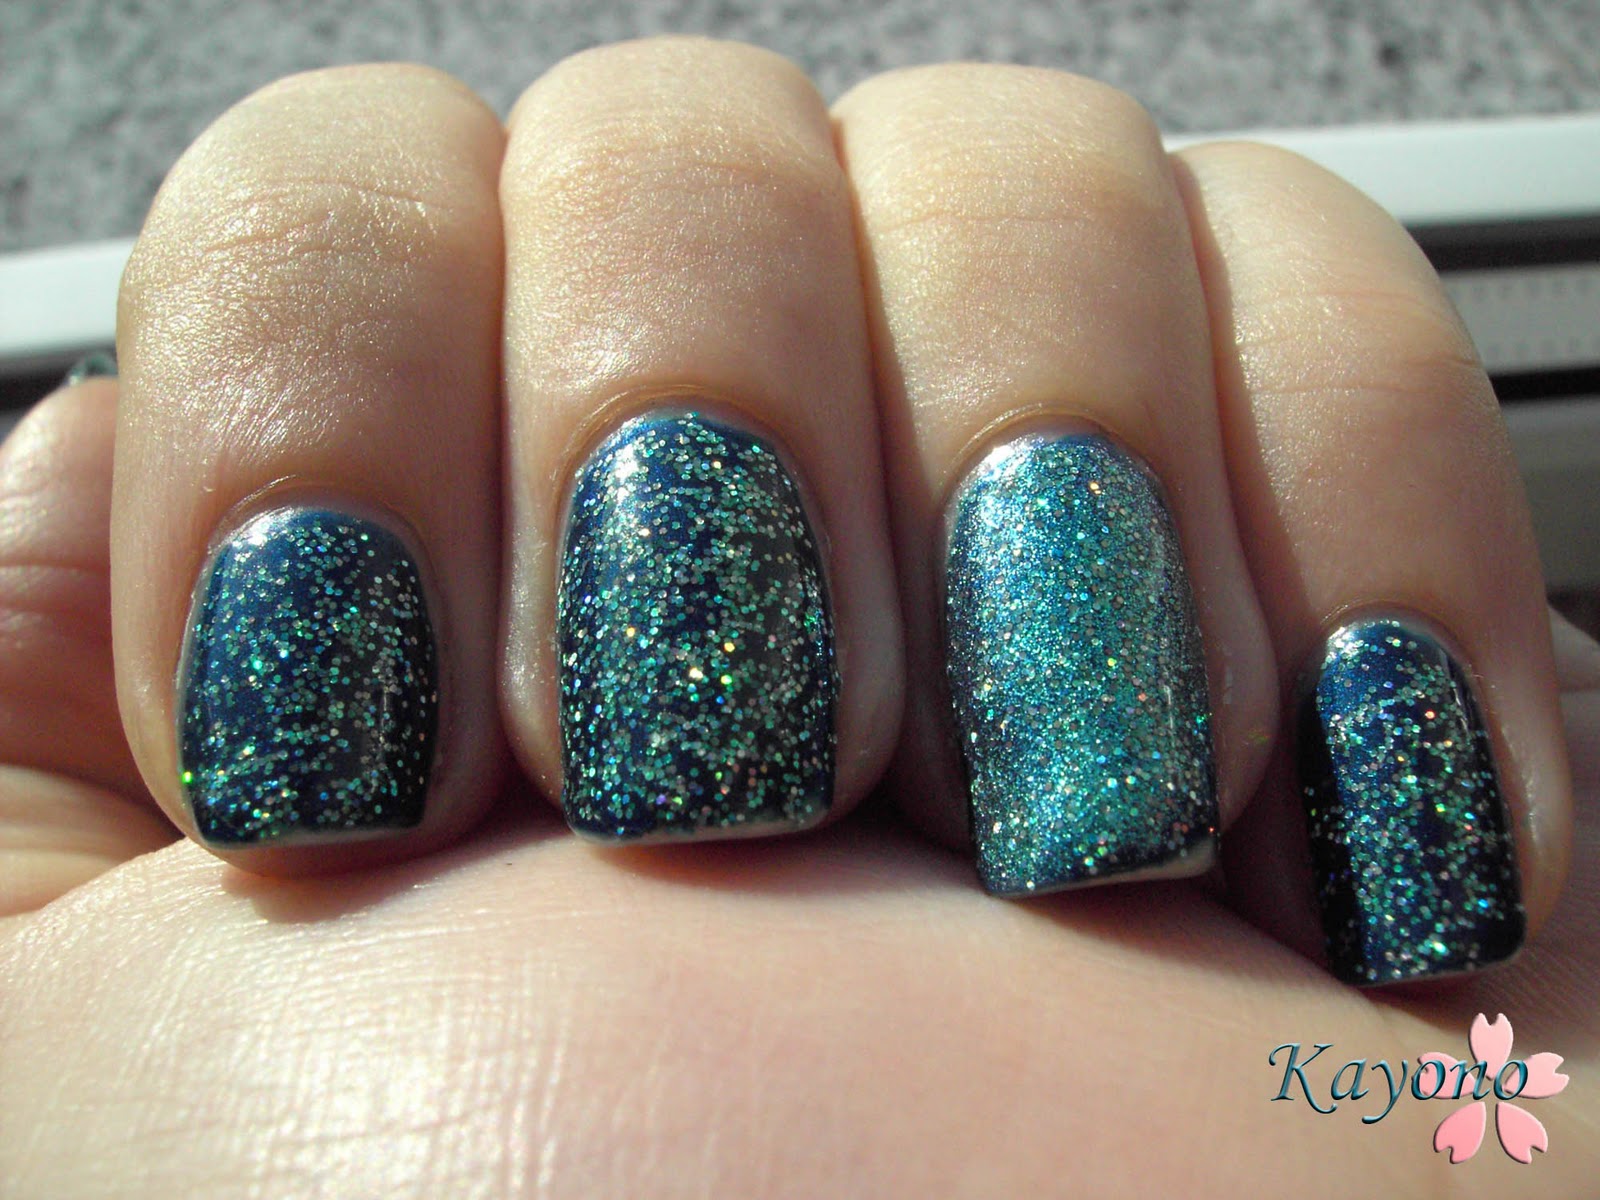
Wir lackieren uns erst mal die Nägel in der Farbe unserer Wahl. Ich habe Blau gewählt, weil der Kontrast zum Weiß für das Tutorial einfach besser ist. Das bleibt aber letztlich euch überlassen. Wichtig ist, dass der Lack wirklich gut trocken ist. Sonst kann es passieren, dass man sich später Dellen reinzaubert...


Nun zücken wir unseren Zahnstocher, tauchen eine Spitze in die weiße Farbe und malen drei Striche als Grundgerüst für die Schneeflocke. Um ein Gefühl dafür zu bekommen, vielleicht auf einem Blatt Papier mal ein paar Probestriche malen.


Als Nächstes fügen wir an die Enden unserer drei Striche jeweils kleine V's hinzu, so wie in dem Foto.


Dann ein Stück weiter unten noch ein paar V's. An dieser Stelle kann man im Grunde bereits aufhören, wenn einem das schneeflockig genug ist.


Wer gern noch ein paar mehr Details hätte, der kann zum Beispiel noch Pünktchen hinzufügen, wie ich es jetzt gemacht habe. Dazu den Zahnstocher dann einfach senkrecht halten - die Pünktchen entstehen dann ganz leicht so schön rund.


Das Ganze gut trocknen lassen und dann mit dem Top Coat der Wahl versiegeln. Ist ein Muss, wenn man mit Acrylfarbe gearbeitet hat, weil diese sonst in Null-komma-Nichts wieder abbröselt. Ich habe links einen normalen Top Coat mit Glanzfinish verwendet und rechts einen mattierenden Top Coat.


Um das Ausprobieren zu erleichtern, habe ich mal ein Set zusammengestellt, mit dem es direkt losgehen kann. Dieses Set verlose ich im Rahmen unseres Adventskalenders!

Es beinhaltet einen weißen und einen blauen essence Lack, sowie einen silbrigen Lack von p2. Zum weiteren Verzieren ist noch ein Döschen mit allerlei Dekosteinchen und Perlen dabei. Und wem beim Verzieren der Nägel die Hände immer so kalt werden wie mir, der kann sich im Anschluss wohlverdient ein Bad einlassen und den Aromazauber Wintertraum genießen.

Was müsst ihr dafür tun?

* Seid oder werdet Leser meines Blogs und schreibt mir unter diesen Post einen Kommentar in dem ihr mir schildert, wie ihr als Kind die Adventszeit verbracht habt. Gab es bei euch Rituale? Habt ihr Gedichte auswendig gelernt oder gebastelt wie die Weltmeister?

* Seid 18 Jahre alt oder habt im Gewinnfall eine Einverständniserklärung eurer Eltern, dass ihr mir eure Adresse geben dürft

* Ihr müsst in Deutschland, Österreich oder der Schweiz wohnen oder eine deutsche Adresse angeben können, an die ich das Set verschicken soll

* Ihr könnt bis einschließlich 21.12.2011 teilnehmen. Ich werde mich bemühen am 22.12. gleich den Gewinner zu ziehen

Ich freue mich auf eure Kommentare!

Morgen geht es dann bei bei Grinsekatze mit dem achten Türchen weiter! >Hier< findet ihr noch mal die Übersicht aller Blogs, die an Tinks Blogger Adventskalender 2011 teilnehmen!

Montag, 5. Dezember 2011

My first "franken"

Today I want to show you a few pictures of my first "franken".

Okay, I originally really wanted OPI's Sparclelicious, but couldn't get my hands on it. (I refuse to pay 16€ in my local Douglas store...) One day I noticed that one of essence's nail art twins reminded me a lot of Sparclelicious. I'm talking about the glitter twin Troy. It's basically blue and pink micro glitter suspended in a clear base. So I thought... maybe I can recreate Sparclelicious if I add some gold micro glitter to it!?

So my quest to find a gold micro glitter polish started and it was surprisingly hard to find one. Most seemed to yellow to me... or the glitter was too big, etc. In the end I bought a bottle of a no-name glitter from Claire's. I mixed them together in an old polish bottle of mine. It turned out a bit goopy, but I think I can solve that by adding some thinner. I misplaced mine for now though... ^^;

I really liked the result and wore it the same night over my already existing manicure: the violett gradient mani I showed in my last post. I think I added like 3 layers of glitter. You don't want to know how thick the polish became after all that violett, several layers sponged on top and then 3 layers of glitter! It was ridiculous.

Anyway, that's what it looked like:


By now, I got my hands on the original OPI polish, yay. So I had to compare my wannabe-dupe to it. Haha, they are quite different. While I always thought of the gold glitter polishes to be way to yellow, that's what I should have bought! The glitter I used looks really pretty, but compared to the one used in Sparclelicious, it looks almost champagne gold. The gold is not so much in-your-face as the one in Sparclelicious. It's like having a gold and silverish version of Sparclelicious. But aside from the color difference in the gold glitter they are really close.


What do you think of my first try on frankening? :D
Related Posts Plugin for WordPress, Blogger...